
Soraru's persona of After the Rain's Wasurerarenbo amigurumi is here! The design is taken from the MV of Wasurerarenbo that you can watch here made by Ryuusee (Ryuusee is so amazing orz)


To crochet this pattern, you are going to need:
- Yarn of these colors : black, light blue, yellow, and white
- Crochet hook
- White, yellow, light blue, and dark brown felt
- White and black embroidery yarn
- Stuffing
- Glue
- Scissors, sewing needle, safety pin, and other necessary tools
Abbreviations:
ch = chain
st = stitch
sc = single
crochet
inc =
increase (2 sc in one st)
dec =
decrease (2 st together)
sl st = slip
stitch
sl st dec =
decrease with slip stitch (please check out how I do sl st dec here)
hdc = half double crochet
hdc dec = decrease with half double crochet (please check out how I do hdc dec for this pattern here)
hdc dec = decrease with half double crochet (please check out how I do hdc dec for this pattern here)
dc = double
crochet
dc dec =
decrease with double crochet (please check out how I do dc dec for this pattern here)
*…* = repeat
the given number of times
(…) = total
number of stitches of the round
Head
With black
yarn, work in spiral (continuous round)
Rnd 1. 6 sc
in magic ring (6)
Rnd 2. *inc*
repeat 6 times (12)
Rnd 3. *sc in
the next 1 st, inc* repeat 6 times (18)
Rnd 4. *sc in
the next 2 st, inc* repeat 6 times (24)
Rnd 5. *sc in
the next 3 st, inc* repeat 6 times (30)
Rnd 6. *sc in
the next 4 st, inc* repeat 6 times (36)
Rnd 7. *sc in
the next 5 st, inc* repeat 6 times (42)
Rnd 8. *sc in
the next 6 st, inc* repeat 6 times (48)
Rnd 9-14. sc
all around 48 st (48)
Rnd 15. *sc
in the next 6 st, dec* repeat 6 times (42)
Rnd 16. *sc
in the next 5 st, dec* repeat 6 times (36)
Rnd 17. *sc
in the next 4 st, dec* repeat 6 times (30)
Rnd 18. *sc
in the next 3 st, dec* repeat 6 times (24)
Rnd 19. *sc
in the next 2 st, dec* repeat 6 times (18)
Rnd 20. *sc
in the next 1 st, dec* repeat 6 times (12)
Stuff.
Rnd 21. *dec*
repeat 6 times (6)
Fasten off,
weave in the end.
Hood
With
light blue yarn, work in spiral (continuous round)
ch 6 as the
foundation chain
Rnd 1. from
the second chain from hook, sc in the back loops of the next 4 chain of the
foundation chain, sc 4 in the 5th chain of the foundation chain,
turn, and sc in the front loops of the foundation chain. (12)
Rnd 2. *sc in
the next 1 st, inc* repeat 6 times (18)
Rnd 3. *sc in
the next 2 st, inc* repeat 6 times (24)
Rnd 4. *sc in
the next 3 st, inc* repeat 6 times (30)
Rnd 5. *sc in
the next 4 st, inc* repeat 6 times (36)
Rnd 6. *sc in
the next 5 st, inc* repeat 6 times (42)
Rnd 7. *sc in
the next 6 st, inc* repeat 6 times (48)
Rnd 8. *sc in
the next 7 st, inc* repeat 6 times (54)
Rnd 9-17. sc
all around 54 st (54)
Insert the
head
Rnd 18. *sc
in the next 7 st, dec* repeat 6 times (48)
Rnd 19. hdc
in the next 6 st, hdc dec, dc in the next 6 st, dc dec, hdc in the next 6 sc,
hdc dec, sc in the next 6 sc, dec, sl st in the next 6 st, sl st dec, sc in the
next 6 st, dec (42)
Rnd 20. hdc
in the next 5 st, hdc dec, dc in the next 5 st, dc dec, hdc in the next 5 sc,
hdc dec, sc in the next 5 sc, dec, sl st in the next 5 st, sl st dec, sc in the
next 5 st, dec (36)
Fasten off,
weave in the end

Hair
There are two kinds of pieces for hair. See below:

With yellow yarn, work in spiral (continuous round)
Rnd 1. 4 sc in magic ring (4)
Rnd 2. sc all around 4 st (4)
Rnd 3. *inc* repeat 4 times (8)
Rnd 4. sc all around 8 st (8)
Rnd 5. sc in the next 3 st, inc in the next 2 st, sc in the next 3 st (10)
Rnd 6. sc in the next 3 st, inc in the next 4 st, sc in the next 3 st (14)
Rnd 7. dec 2 times, sc in the next 6 st, dec 2 times(10)
Rnd 8. sc all around 10 st (10)
Rnd 9. dec, sc in the next 6 st, dec (8)
Rnd 10. *dec* repeat 4 times (4)
Fasten off, leave a long tail for sewing, flatten, don't stuff.
Piece b
With yellow yarn, work in spiral (continuous round)
Rnd 1. 4 sc in magic ring (4)
Rnd 2. sc all around 4 st (4)
Rnd 3. *inc* repeat 4 times (8)
Rnd 4. sc all around 8 st (8)
Rnd 5. *sc in the next 3 st, inc* repeat 2 times (10)
Cut the yarn (kinda long), fasten off. Make two of the above pattern. Don't cut the yarn for the second piece! Connect the two pieces with the leftover yarn of the first piece by sewing two stitches of each piece together. Look below:

Rnd 6. sc all around 16 st (16)
Rnd 7. *sc in the next 2 st, dec* repeat 4 times (12)
Rnd 8. sc all around 12 st (12)
Rnd 9. *dec* repeat 6 times (6)
Fasten off, leave a long tail for sewing, flatten, don't stuff.
Horn (make two)
With yellow yarn, work in spiral (continuous round)
Rnd 1. 4 sc in magic ring (4)
Rnd 2. sc all around 4 st (4)
Rnd 3. *inc* repeat 4 times (8)
Rnd 4. sc all around 8 st (8)
Rnd 5. *sc in the next 1 st, inc* repeat 4 times (12)
Rnd 6. sc all around 12 st (12)
Rnd 7. inc in the next 3 st, dec 3 times, inc in the next 3 st (15)
Rnd 8. inc in the next 4 st, dec 4 times, inc in the next 3 st (18)
Rnd 9. sc in the next 5 st, dec 4 times, sc in the next 5 st (14)
Fasten off, leave a long tail for sewing, stuff.

Body
With light blue yarn, work in spiral (continuous round)
Rnd 1.6 sc in magic ring (6)
Rnd 2.*inc* repeat 6 times (12)
Rnd 3. *sc in the next 1 st, inc* repeat 6 times (18)
Rnd 4. *sc in the next 2 st, inc* repeat 6 times (24)
Rnd 5. [in back loops only] sc all around 24 st (24)
Rnd 6. sc all around 24 st (24)
Rnd 7. *sc in the next 3 st, inc* repeat 6 times (30)
Rnd 8-9. sc all around 30 st (30)
Rnd 10. *sc in the next 4 st, inc* repeat 6 times (36)
Rnd 11-16. sc all around 36 st (36)
Rnd 17. *sc in the next 5 st, inc* repeat 6 times (42)
Rnd 18. sc all around 42 st (42)
Change to white yarn
Rnd 19-20.sc all around 42 st (42)
Fasten off, weave in the end.

Bottom
With white yarn, work in spiral (continuous round)
Rnd 1. 6 sc in magic ring (6)
Rnd 2.*inc* repeat 6 times (12)
Rnd 3.*inc* repeat 12 times (24)
Rnd 4.*sc in the next 3 st, inc* repeat 6 times (30)
Rnd 5-6.sc all around 30 st (30)
Rnd 7. *sc in the next 4 st, inc* repeat 6 times (36)
Fasten off, weave in the end
Hand (make 2)
Start with white yarn, work in spiral (continuous round)
Rnd 1. 4 sc in magic ring (4)
Rnd 2. *inc* repeat 4 times (8)
Rnd 3. *inc* repeat 8 times (16)
Rnd 4. [in back loops only] sc all around 16 st (16)
Rnd 5. *sc in the next 2 st, dec* repeat 4 times (12)
Rnd 6. sc all around 12 st (12)
Change to light blue yarn
Rnd 7. sc all around 12 st (12)
Rnd 8. *sc in the next 2 st, dec* repeat 3 times (9)
Rnd 9-13. sc all around 9 st (9)
Cut out two circles from cardboard (around the size of the "palm"), put it into the hands so the tip of the hand would be flatter. Stuff. Flatten the edges and crochet in the next 4 st (there will be 1 st remaining, just ignore it) through both layers together to close it. Fasten off, leave a long tail for sewing

Legs (make 2)
With white yarn, work in spiral (continuous round)
Rnd 1. 5 sc
in magic ring (5)
Rnd 2. *inc*
repeat 5 times (10)
Rnd 3. *sc in
the next 1 st, inc*, repeat 5 times (15)
Rnd 4. [in
back loops only] sc all around 15 st (15)
Rnd 5-10. sc
all around 15 st (15)
Fasten off,
leave a long tail for sewing. Stuff. Cut out some light blue felt and glue them on the legs like the picture below.

Tail
With light blue yarn, work in spiral (continuous round)
Rnd 1. 4 sc in magic ring (4)
Rnd 2. *inc* repeat 4 times (8)
Rnd 3-6. sc all around 8 st (8)
Rnd 7. *sc in the next1 st, inc* repeat 4 times (12)
Rnd 8-11. sc all around 12 st (12)
Rnd 12. inc in the next 3 st, dec 3 times, inc in the next 3 st (15)
Rnd 13. inc in the next 4 st, dec 4 times, inc in the next 3 st (18)
Rnd 14. inc in the next 4 st, dec 5 times, inc in the next 4 st (21)
Rnd 15. sc in the next 6 st, dec 5 times, sc in the next 5 st (16)
Fasten off, leave a long tail for sewing. Stuff.
Tail bottom
With white yarn, work in turning rows
ch 3 as foundation chain
Rnd 1. starting from the second ch from hook, sc in the next 2 st (2), ch 1 and turn
Rnd 2. sc in the next 1 st, inc (3), ch 1 and turn
Rnd 3. sc in the next 2 st, inc (4), ch 1 and turn
Rnd 4-5. sc in the next 4 st (4), ch 1 and turn
Rnd 6. sc in the next 3 st, inc (5), ch 1 and turn
Rnd 7-8. sc in the next 5 st (5), ch 1 and turn
Rnd 9. sc in the next 4 st, inc (6), ch 1 and turn
Rnd 10. sc in the next 6 st (6), ch 1 and turn
Rnd 11. sc in the next 6 st (6)
sl st around all the sides of the bottom of the tail for smoother edges. Fasten off, leave a long tail for sewing. Sew on the bottom side of the tail made before.

Assembly
Cut out two pieces of yellow felt as eyes and glue it on the head. Embroider a mouth with white embroidery yarn. Please be sure not to make the
face upside down. The part of the hood with the double crochets is the top part
and the one with the slip stitches is the bottom part.
Sew the hair on. Sew the "a" pieces first on the left and right side of the head then sew the "b" piece on the middle, sort of overlapping the "a" pieces. Don't sew on all side, only sew on the top side of each pieces so the hair don't look like they stick to the face.
Sew the hair on. Sew the "a" pieces first on the left and right side of the head then sew the "b" piece on the middle, sort of overlapping the "a" pieces. Don't sew on all side, only sew on the top side of each pieces so the hair don't look like they stick to the face.

Sew the horns on each side of the head. The back of the horn should be placed at around the 9th row of the hood and the front should be sewed on the 14th row of the hood.

Cut out two pieces of oval from white felt and yellow felt (the yellow felt should be slightly smaller than the white felt) then glue them just a little bit above the horns as the "eyes" of the dinosaur hood.
Sew the bottom of the body to the 16th row of the body (the inner side). Use light blue yarn so it won't be visible at the outer side of the body. Stuff the body before you close up the sewing.
 |
| note : yours might look less "deep" because I refined the body after I took this photo. |
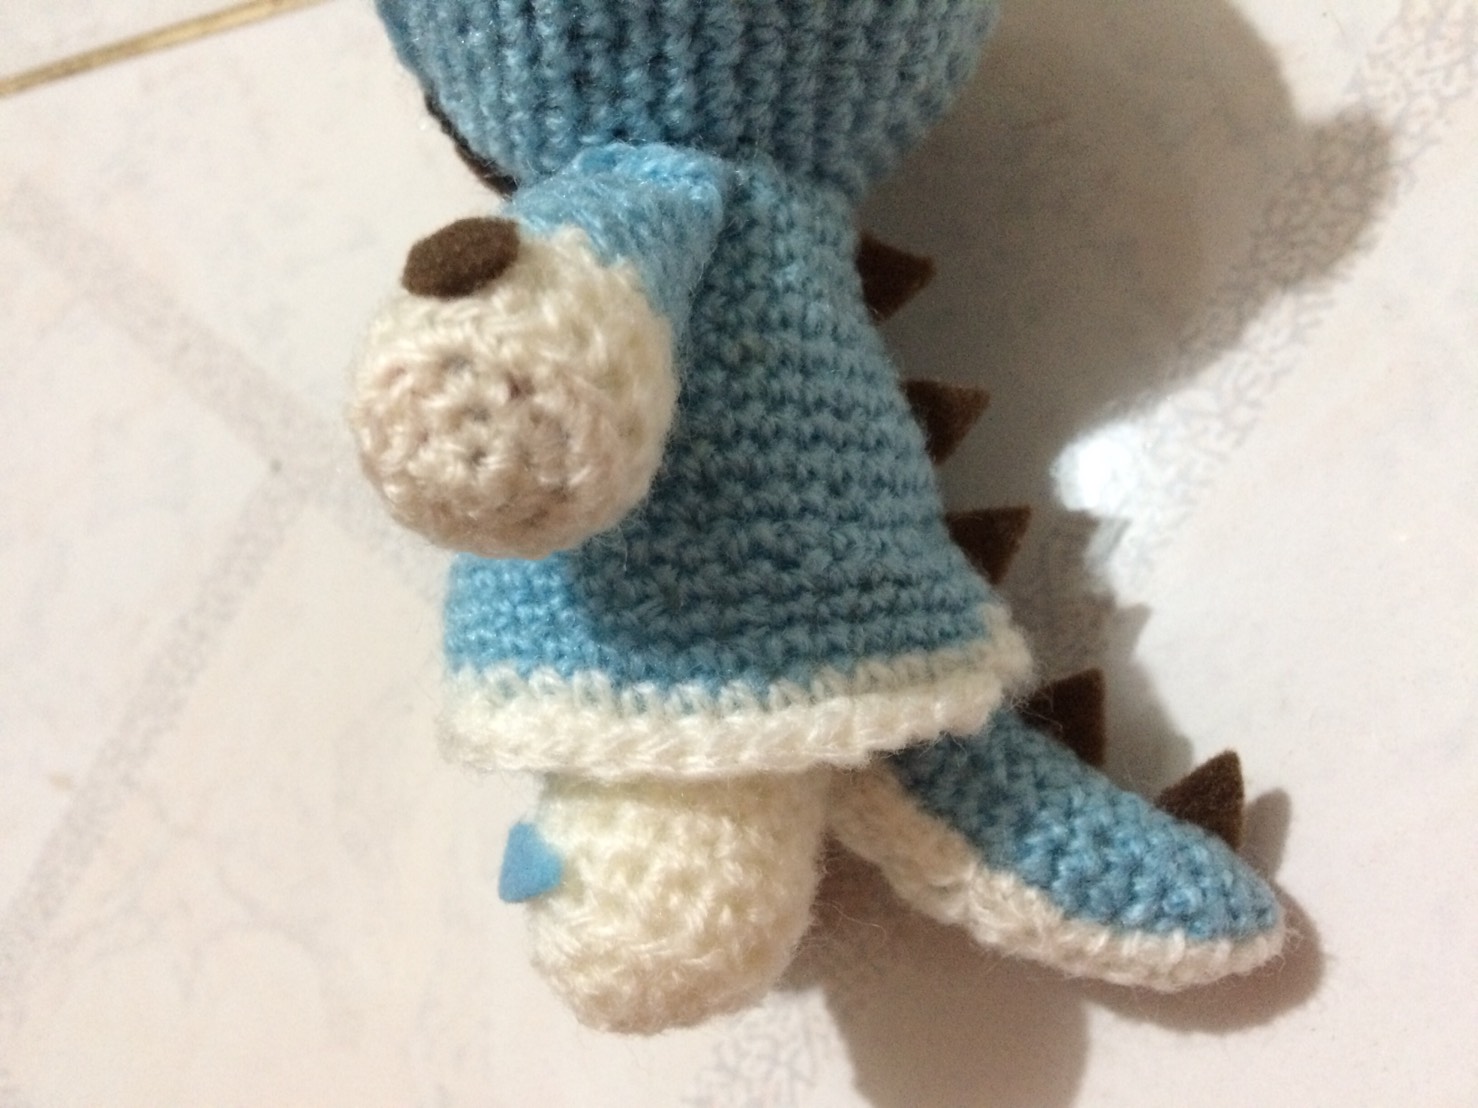
Sew the body to the head. Embroider some pattern onto the body with black embroidery yarn. Cut out a circle from dark brown felt and glue it as a button.

Cut out two circles of dark brown felt and glue it to the hand as buttons. Attach the hand to the sides of the body. If you want to make the hand moveable, follow the instruction shown here.

Sew the legs on the bottom of the body.

Sew the tail in place

Cut out some triangles from dark brown felt then glue them to the tail and back of the body as spikes.

Your Soraru is finished! I really love how he could stand on his own. Enjoy your creation and make sure to share him with your friends~
 |
| Lovey dovey |
Comments
Post a Comment